You are viewing an old version of this page. View the current version.
Compare with Current
View Page History
Version 1
Current »
To Add Exams from a web portal, follow below steps.
Recommended browsers are latest version of Google Chrome and Firefox.
View Exam Marks
|
Depending on your Role you can view the Exam Marks, please refer to introduction section for permission matrix.
Web portal only offers to View the Subject Wise Exams Marks,
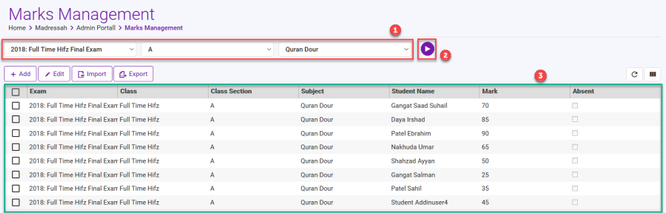
- Navigate to Madrasah > Admin or Teacher or Student or Parent Portal > Exam Marks
- Select the Exam
- Select the Class Section
- Select the Subject
- Click on Play button
- You will see the Marks assigned.
|
Add Exam Marks
You can mark the Exams either Subject wise or Student wise, which ever is easier for you.
Add Subject Wise Marks
|

|
Depending on your Role you can Add/Edit the Exam, please refer to introduction section for permission matrix.
To Add the Subject Wise Exam Marks,
- Ensure the Exam is unlocked
- Navigate to Madrasah > Admin or Teacher Portal > Exam Marks
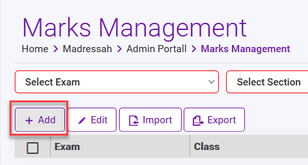
- Click on + Add
- Select the "Manage Subject Marks" (1)
- Select the Exam, Select the Class Section , Select the Subject (2)
- Click on Confirm (3) will load the students on right side.
- Marks must be out of 100 as the Exam reports are generated based on this.
- Enter the desired marks for the Subject on screen for all the application students (4)
- If a student was absent you can mark it here.
- Tap on Save when done (5)
- An automated notification will be sent out to parents and students advising the exam marks being updated.
- You have successfully added the Subject Wise Exam Marks.
|
Add Student Wise Marks
|
|
Depending on your Role you can Add/Edit the Exam, please refer to introduction section for permission matrix.
To Add the Student Wise Exam Marks,
- Ensure the Exam is unlocked
- Navigate to Madrasah > Admin or Teacher Portal > Exam Marks
- Click on + Add
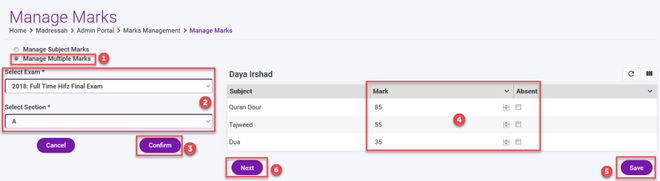
- Select the "Manage Multiple Marks" (1)
- Select the Exam, Select the Class Section (2)
- Click on Confirm (3) will load the student and subjects in the exam on right side.
- Marks must be out of 100 as the Exam reports are generated based on this.
- Enter the desired marks for the Subject on screen for all the application students (4)
- If a student was absent you can mark it here.
- Tap on Save when done (5)
- Click next to mark rest of the students in this exam (6)
- An automated notification will be sent out to parents and students advising the exam marks being updated.
- You have successfully added the Subject Wise Exam Marks.
|
Edit Exam Marks
You can Edit the Exams Marks either Subject wise or Student wise, which ever is easier for you.
Edit Subject Wise Marks
|
|
Depending on your Role you can Add/Edit the Exam, please refer to introduction section for permission matrix.
To Edit the Subject Wise Exam Marks,
- Ensure the Exam is unlocked
- Navigate to Madrasah > Admin or Teacher Portal > Exam Marks
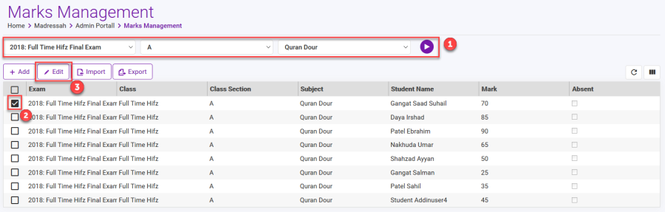
- Select the Exam, Class Section & Subject click on Run (1)
- Select any one entry and than Click on Edit Button (2)
- Select the "Manage Subject Marks" (1)
- Confirm the Exam, Class Section & Subject
- Click on Confirm will load the students on right side. (4)
- Marks must be out of 100 as the Exam reports are generated based on this.
- Enter the desired marks for the Subject on screen for all the application students (4)
- If a student was absent you can mark it here.
- Tap on Save when done (5)
- An automated notification will be sent out to parents and students advising the exam marks being updated.
- You have successfully edited the Subject Wise Exam Marks.
|
Edit Student Wise Marks
|
|
Depending on your Role you can Add/Edit the Exam, please refer to introduction section for permission matrix.
To Edit the Student Wise Exam Marks,
- Ensure the Exam is unlocked
- Navigate to Madrasah > Admin or Teacher Portal > Exam Marks
- Select the Exam, Class Section, Subjects & than click on Run (2)
- Select any one entry and than Click on Edit Button (2)
- Select the "Manage Multiple Marks" (1)
- Confirm the Exam & Class Section
- Click on Confirm (3)
- will load the students on right side. (4)
- Marks must be out of 100 as the Exam reports are generated based on this.
- Enter the desired marks for the Subject on screen for all the application students (4)
- If a student was absent you can mark it here.
- Tap on Save when done (5)
- Click on Next (6) to update other students in this exam.
- An automated notification will be sent out to parents and students advising the exam marks being updated.
- You have successfully edited the Subject Wise Exam Marks.
|