How Ad-Din Subscriptions Works
- Estimated time to complete: 15 Minute
- Difficulty: Moderate
- Prerequisites: None
Introduction
We have the obligation to rely on the payment mechanism offered by various platform through which our solution is distributed. This in a way is a guarantee to you that we do not have access to your payment details, as the payments are processed by Google, Apple and Stripe who are our provider for payment processing depending on the device.
If you are using Ad-Din for IOS, payments are processed by Apple on the App Store. App Store accepts:
- Credit Cards in most countries
- Direct carrier billing (limited countries)
- PayPal (limited countries)
- iTunes gift Cards (limited countries), you can find them on major chain stores like Wal-Mart etc.
If you are using Ad-Din for Android, payments are processed by Google on the Play Store which accepts:
- Credit Cards in most countries
- Direct carrier billing (limited countries)
- PayPal (limited countries)
- Google Play Gift Cards (limited countries), you can find them on major chain stores like Wal-Mart etc.
We also offer the Credit Card Billing for individual subscriptions & invoice billing for organizational Bulk subscriptions through Stripe from our web portal https://portal.ad-din.ca
Learn how prorations work with Ad-Din Subscriptions here.
Standard Terms:
- Our two Subscription Types Are Monthly & Yearly
- Our Premium subscriptions are flat rate and role based (for example you see content based on your role such as General user, Admin, Teacher, Parent, Students, Staff or Volunteer)
- Ad-Din's Premium includes: Access to Madrasah module based on your Role, Carpool, Events (push notifications), Messages (push notifications) & Role based Reports. Plus, it also includes all future modules and updates. Detailed comparison of our free/premium is available at https://ad-din.ca
- Depending on your Role, subscription from any platform gives you unrestricted access to collaborate on Ad-Din Solution from any devices such as Apple, Android or Computer.
- It's completely Ad-Free for All.
- Subscriptions are Flat rate regardless of the role.
- By choice parents can share single account, and for small kids the subscription is optional.
- We only respect an account be shared with immediate family member by choice. Sharing outside this domain will violate out terms. And may result in cancellation of your service.
- For free features, users/congregants don't need subscription.
- Payment will be charged to your account and credit card on file or via Invoice whichever is preferred at confirmation of purchase. Credit Card gives you instant access to your subscription & our services.
- Organizational Subscription via invoicing or other method takes some time for processing, till the payment is not cleared in our system, subscriptions are not activated.
- Subscription automatically renews unless you cancel them.
- Ad-Din Premium subscriptions is per user, sharing account except within immediate family (Spouse & Children) will violate our terms.
- For Individual & Organizational subscriptions, renewal will be charged immediately at the end of the current term to a card on your account.
- For Invoice billing, at the end of the term new invoice is generated which has to be paid before the term expires to avoid service disruptions.
- Cancellation of Individual subscriptions from Stripe, App Store and Play Store, will be cancelled at the end of the current term. No refund is processed; Subscription remains active till the term ends.
- Cancellation of organizational subscriptions requires to reduce the Subscription qty to zero from our web portal. Organizations Subscriptions only get charged for what they used, any unused amount will remain on account for future renewal.
- For organizational Subscriptions when a user leaves and Admin reduce the quantity of subscriptions, it will result in credit, and will remain on your account. And will be utilized for next renewal.
- Credit Card details are stored and managed by Apple, Google & Stripe, Ad-Din only see the last four digit of the card to help validate and support our customers with billing. All three are certified to PCI Service Provider Level 1 and regularly audited. This is the most stringent level of certification available in the payments industry. For more details on how secure the Apple, Google & Stripe environment is please visit their site.
- Ad-Din Terms: https://ad-din.ca/ad-din-terms-of-service
- Ad-Din Privacy: https://ad-din.ca/ad-din-privacy-policy
- Ad-Din Contact: https://ad-din.atlassian.net/servicedesk/customer/portal/3
Who all requires a subscription and how does a Family Subscription work in Ad-Din?
- Administrators will have full control over the Organization’s (Masjid/Madrasah) accounts in Ad-Din App. If Masjid and Madrasah Administrators are different, two subscription will be required.
- Masjid Staff do not play an active Role in Ad-Din App, Subscription is optional and required for them be displayed under the Dynamic Staff Directory with their Biography.
- Volunteers do not play an active Role in Ad-Din App, you can manage their records to target Push Notifications and email as when needed. No subscription is required.
- Teachers play an active role in the Madrasah/Religious/Academic School.
- Students subscription are included in Ad-Din’s Family subscription, this has to be enabled per organization, optional. For example, a student who is 15 year old and would like to have access to Student Portal in Ad-Din App/Web to either view the details or submit the assignment will require a subscription.
- Parent subscriptions are included in Ad-Din’s Family subscription, and are required for a collaboration and parent portal access from either mobile or web.
Sharing account elsewhere violate our terms. |
Let's understand how the subscription from each of these distribution platform works.
Ad-Din's Subscription via Apple
- The subscription from Apple App Store will give you same level of access as if it was purchased from Play store or web portal via Stripe.
- Individual Subscription remains with user no matter where they go, compare to Organizational Subscription which can be taken away by Admin.
- Based on your Role you can login using the same account from any device unrestricted.
- Payment will be charged to iTunes Account at confirmation of purchase.
Ad-Din's Subscription via Google
- The subscription from Google Play Store will give you same level of access as if it was purchased from Play store or web portal via Stripe.
- Individual Subscription remains with user no matter where they go, compare to Organizational Subscription which can be taken away by Admin.
- Based on your Role you can login using the same account from any device unrestricted.
- Payment will be charged to Google Play Account at confirmation of purchase.
Ad-Din's Subscription via Stripe
- Most individual subscriptions will be through App Stores, but users can also subscribe via Web Portal which is processed by Stripe platform for Ad-Din.
- Organizations who want to provide and manage subscriptions for their Masjid & Madrasah Role Based users (Admin, Teacher, Parent, Student, Staff & Volunteer), can purchase bulk subscriptions via Ad-Din Web Portal (portal.ad-din.ca) powered by Stripe.
Ad-Din's Organizational Subscription via Stripe
- Organizational Bulk Subscriptions can be managed from https://portal.ad-din.ca.
- You can only manage Subscriptions for Organizations that you are admin of.
- Masjid & Madrasah subscriptions has to be managed separately.
- Through Stripe We have two payment methods available,
- Via Credit Card (Default)
- Via Invoice (Pay by Cheque/Check)
- Administrators can change the method or payment at any time without impacting already Purchased and allocated subscriptions.
How to Setup, Allocate and Revoke Organizational Subscriptions via Credit Card?
- Login and go to Settings > Organizations > Organization Subscription Management.
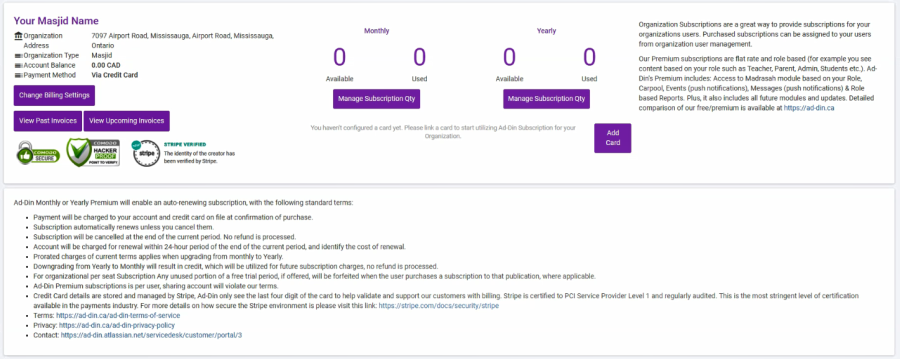
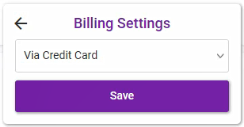
- Default Payment Method is via Credit Card
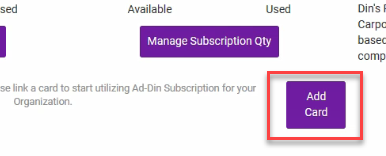
- Next to pay for organizational subscriptions via credit card, click on Add a Credit Card
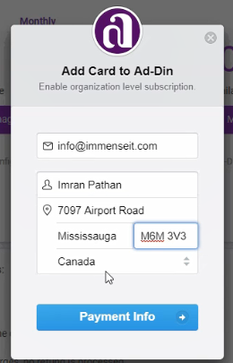
- Click on Payment Info
- Enter the Credit Card Details
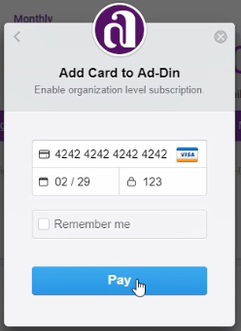
- Click on Pay
- Your Card will show up as below.

- You don't get charged till you increase the Subscription Quantity
- Select the Subscription type you want to purchase and increase the quantity.
- Yearly is more desired and cheaper to have a simplified billing, and only charged by usage.
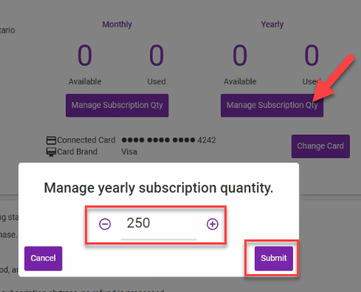
- Click on Submit, and click on "I understand, Change"
- NOTE: This Quantity is the total quantity of Subscriptions you need, for example, if you already have 50 Subscription and you need another 200 you must enter 250. This will credit you 50 and charge you for 250.
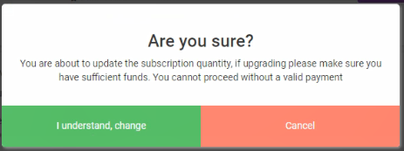

- Usually the processing is quite fast, so simply refreshing the page will show you the new subscribed quantity.
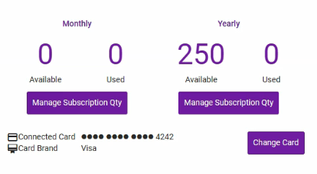
- You have successfully setup the Credit card & purchased the Organizational Subscriptions.
- Now you have Subscriptions available in your Organization pool, to View the invoice click on View Past Invoices (By default past 50 Invoices will load), You can also see one future invoice.
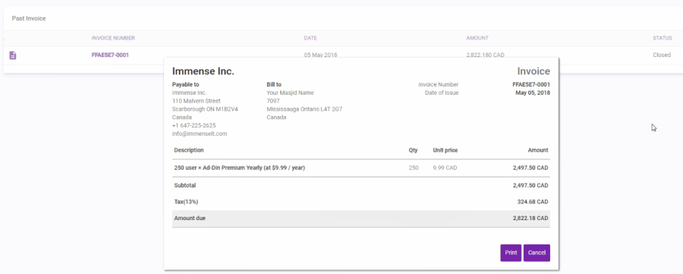
- To allocate subscription to user follow guide below.
How to Setup, Allocate and Revoke Organizational Subscriptions via Invoicing?
- Login and go to Settings > Organizations > Organization Subscription Management.

- Default Payment Method is via Credit Card
- Change the Method by clicking Change Billing Settings, select the Via Invoice
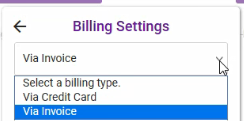
- Select the country
- Select the State
- Enter the Postal Code
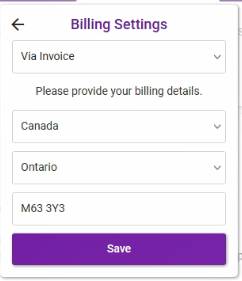
- Save
- As you can see your Payment Method is now Via Invoice. Any credit card on file has been removed but any old active purchase and allocation on account will remain intact.
- You can now increase the Quantity of subscription, ensure you have counted the required quantity properly since once the invoice is generated till its cleared the Quantity can not be changed.
- An invoice will be generated automatically, and sent to email of the organization on file, ensure you have correct email on organization account which is actively monitored.
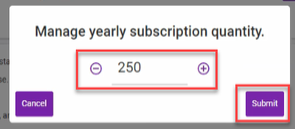
- You can pay the invoice via either methods supported by Stripe as mentioned in the introduction section above.
- NOTE: This Quantity is the total quantity of Subscriptions you need, for example, if you already have 50 Subscription and you need another 200 you must enter 250. This will credit you 50 and charge you for 250. Any used/unused time will be prorated automatically per second.
- If there are any pending invoice, you can not change the subscriptions quantity till pending invoice is cleared, but can continue to allocate from the pool available on account. You may receive this message if you try to change the Subscriptions while invoice is pending.

- Once the invoice is paid or Marked Paid by Ad-Din, your subscriptions will become active and purchased quantity will be available for distributions.
- To allocate subscription to user follow guide below.
Allocate subscription from the pool
- Now you can begin to distribute the subscriptions to your Role Based users.
- To Distribute the Subscription, locate the user from Settings > Organization > User Management > Select the Organization where you purchased the Subscription above.

- Select user and click on Edit
- On Bottom right corner you will see an option of User Subscriptions
- Select the appropriate Subscription you have available in the organization pool for example if you purchased Yearly allocate from Yearly and vice-versa.
- For this example, we clicked on Yearly


- Click on Ok, Allocate.
- Administrators and User can see the subscription allocation from their profile.
Revoke subscription from user
- The Cancelled Subscription button on a user account will only appear for Administrator if it was from your own organization subscription pool, for example if user got subscription from other organization or he/she has purchased own subscription, the Cancel subscription button will not appear for Admin.
- To remove the organization subscription simply click Cancel Subscription from an individual user.

- This will increase the Available Subscription Count on your Organization Subscription pool.
- If you will not utilize this subscription in near future, you can[ reduce the subscription quantity.|#_Reducing_Subscription_quantity]
- To change the subscription from yearly to Monthly you have to cancel the old subscription first.
Reducing Subscription quantity
- In a scenario where a Parent/Student, Teacher, Staff or Admin relocates or leaves the organization the Subscription quantity can be reduced which will result in credit and will be kept on account for future renewal.
- Simply click on "Manage Subscription Qty" and select the new quantity of subscription. For example, original Qty 250 and 5 users left, new Qty will be 245 which will result in credit on account and will be used for future renewals. Negative Balance will show on account.

If you want to discuss any billing related or other Ad-Din's Service related matter, please log the ticket from our support portal and we will be happy to address your concerns at priority.
Ad-Din's Individual Subscription via Stripe
- Individual Subscriptions can be managed from https://portal.ad-din.ca.
- The Subscription from Stripe will give you same level of access as if it was purchased from app store.
- Based on your Role you can login using the same account from any device unrestricted.
How to Setup, Individual Subscription via Credit Card through Stripe from Ad-Din Portal.
- Login to Ad-Din Web Portal https://portal.ad-din.ca
- From top right corner click on Premium
- Select the Choice of Subscription Yearly or Monthly.

- Default Payment Method is via Credit Card
- Enter the Contact Information

- Click on Payment Info
- Enter the Credit Card Details

- Click on Pay, you will receive Thank you message


- You can see your Term, Expiration, subscribed via Stripe & Days remaining on premium subscription.
To change your subscription
- You can switch between Monthly to Yearly or Yearly to Monthly.
- To change click on Change Subscription, below popup will appear where you can change your term.

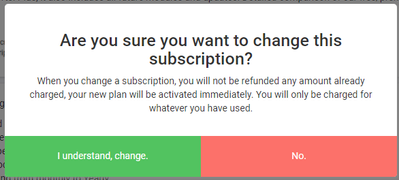
To cancel the Subscription
- In the event you would like to cancel Ad-Din Subscription Click on Cancel Subscription

- When prompted click on I Understand, Cancel
- Your Subscription will remain in Cancelled state but Active till the term ends.
- No refund is processed. We recommend to make use of it.

Though we try our best to serve you, but If for some reason you are not happy with our service or want to discuss other billing matter, please log the ticket from our support portal and we will be happy to address your concerns.
Team Ad-Din


